Pages

Saturday, October 25, 2014

How I Plan and Implement Project/Inquiry Based Learning In My Class

Project/Inquiry Based Learning has been a passion of mine ever since I discovered it about 5 years ago.  Since then, I have stepped out of my comfort zone and transformed the way I teach from a typical Thematic Based style through baby steps taken each year and with the help of an amazing on-line community of teachers with the same passion (you all know who you are!).  My first baby step was taking themes and science/social studies standards and making them more student lead and project based. I got rid of the two week time limit each theme had in the past and allowed more time for students to dig deeper.  I found that students would take my broad theme (oceans) and desire to dig deeper into more specific parts of the theme (sharks, jellyfish, ect.).  As time went on, I was able to take the biggest step and totally let go of my themes and allowed the children's interests drive my instruction, incorporating the standards through those interests.

I am blessed enough to also teach in a district that does not mandate the curriculum I use.  Curriculum programs are purchased to use as tools for our toolbox but not required. Us teachers are trusted and encouraged by our superintendent to write our own curriculum as long as the standards are met.  My building principle also has that kind of faith in us as professionals!  They know that when it comes to children learning what they need to learn, we are the experts!  Project/Inquiry Based Learning is highly encouraged in all grades Pre-K through 12.

Some wonder how I plan for this style of teaching and how it flows. Here are some of the tools that I use.

Once I notice an interest from the students (usually found out through experiences set up for them to explore during play) , I find out what their knowledge and misconceptions are about the subject.  Kind of like a KWL chart! I list all that they know about the subject we will dive into. Then I ask what they wonder.  I list all of their questions. NOW I can plan!

I take their wonderings and create a web map showing the different directions they want to take the inquiry and possible experiences that will help them find answers to their wonderings. I got this web map from the amazing Joanne Babalis and her amazing blog http://myclassroomtransformation.blogspot.com. On the back I have all of the Literacy and Math Standards listed so that I can highlight the ones we will focus on through the inquiry and project. I add any Science and Social Studies Standards to the bottom of the web map.   Here is the link to the web map if you would like it:  Web Organizer 


Here is the link to the Common Core Standards Sheet for Kindergarten Language and Math:  Kindergarten CC Standards

Once I organize my thoughts, I create my inquiry plan using a template I created based on one I found from a Texas school district. It was so long ago I have no memory of which district but if I find out I will add them to give them credit. Their form was 3 pages long. I tweaked it to fit it all on one page. I use this to show the objectives and vocabulary, plan the investigations and materials I will need, show how they will organize the data about what they have learned, possible projects that could result from the inquiry and how we will present the project to the community. 
Here is the link to this inquiry planner if you would like to download it: Inquiry/Project Planner


The next step is to start the investigation phase. In early childhood I set out experiences for them to explore and document what they notice. We also do whole group and small group investigations through books, videos and hands-on experiences. As we answer questions, we add the answers to our wonder chart to show our new learning. We organize this data in a web map format for all to see.

The start of an inquiry wall.  Information is added to it as we learn.

Once we have investigated we use organizational maps to show what we learn. In kindergarten it usually consists of web maps, circle maps, tree charts (can/have/are maps), and brace maps (to show part to whole). We will chose one or two to organize our data.


The next step is the project. We take what we learn and create something to show it! The projects can be individual, small group, or whole group.
Some examples of projects in our room have been turning an area of our room into an ocean, forest and sky to show how animals adapt in the winter. The kids signed up to be on the migration team, adaption team or hibernation team.  They each became experts on their part during the investigation and worked on their part of the project. 

A cave, forest, sky and ocean were created to show what animals do in the winter.

Animals were created, labeled and added to the habitats.

A group interested in map making and migration created this map showing migration patterns of monarchs, geese and grey whales.
Another project was our The Sound Exploration Area created for our school. They saw a need (an area to explore sound) investigated different ways of creating sound, organized the data and designed a Sound Exploration Area! 

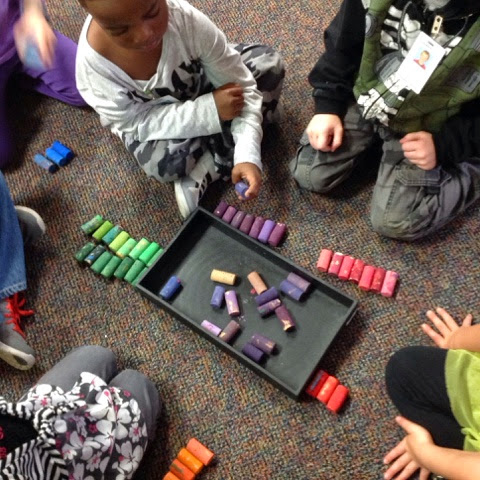
An area for everyone in our school to explore sound which is in our science standards.
They have also turned the inside of our room into a great hall and medeival kitchen and the outside of our room into a castle wall complete with moat and drawbridge after investigating castles!

The outside of our castle.
A map created by a group interested in maps and where different castles were found in the world.
A big book created by a small group about who lived in castles. 
A small group project during our castle inquiry.
They have created murals and big books to show their learning also. 

A mural planned and created by Kindergartners.
The last step is the presentation to show what they had learned. The kids LOVE this part and I've never had a child refuse to present! They are so confident of what they have learned and proud of what they have done that they cannot wait to share it!  I am always so impress with their speaking and listening skills during these presentations! Sometimes small groups go to other classrooms and present what they learned, sometimes we invite parents or other classes to our room to see our presentation, and sometimes we create a video to share with others. They create maps, big books, and, get to show off the projects created at this time! Showing what they have learned through these projects gives the projects an even bigger sense of purpose! They can't wait to show others what they have learned and done!

Presenting different weapons used during medieval times.
I have never had so much fun teaching in my 22 years as I have he past four years!  I could never go back to the way I had done it I the past. The benefits of this way of teaching are not only meeting the standards (the old way did that too) but the 21st Century Skills they are forced to develope when they learn in this type of environment. When inquiring, investigating and creating within thier own interest, they are motivated to collaborate, problem solve, handle frustration, persist if things don't work the first time, and learn from their mistakes. They have to use critical thinking skills and develope research skills.  When kids develop these skills, they can learn ANYTHING!  

My new passion that I am learning to incorporate in my classroom is Playbased Learning! I have been amazed by the learning taking place in this way also....but that's another post!
SaveSave

Saturday, October 11, 2014

Exploring Color and Collaborating to Create a Work of Art Together

We had a mini inquiry of color through a collaborative art piece we created for our room.  I set out red, yellow, blue and white paint and some corks to see what they would discover!


They had to learn self control in order to squeeze just a little bit of paint on the plate in order for us to have enough paint for others to explore color mixing.  We have been focussing on self-regulation. Being aware of and controlling our bodies, our mouths, and our impulses to be more deliberate about our actions!  They have come so far with self-regulation since the beginning of the year! 


They discovered a lot about color and shades as they would create a color, paint a cork, then add another color to it to see how it changed! There was a lot of talk about lighter and darker shades as they created new colors and made changes to those created colors!


We practiced sorting skills and data collecting skills as we started graphing the colors in order to see what colors we needed more of. After graphing the corks and getting the information we needed, the kids would pick a color we needed more of and try to figure out how to make more shades of that color.  They had to think and recall and experiment to figure it out!


After creating the graph some would create a color, then take it to the graph to figure out which color it would go with.  The friend below was trying to figure out if his color was more pink or more purple!


Next the kids sorted the colors into groups and ordered the colors from the lightest shade to the darkest shade. This promoted a lot of discussion and collaboration as they asked friends their opinion about whether a color was darker or lighter and which group a particular color might go.  I loved hearing them verbalized their thoughts to each other!


Next they transferred the corks to the base we would be gluing them on to. We looked at a picture of a rainbow on the promethium board and put the colors in the same order. 


We hot glued the corks with a not-so-hot glue gun onto the base. They were very careful using this tool under supervision, though the glue was warm, but not hot.


Here is our finished art piece to remind us of all the colors we could create by just using red, yellow, blue, and white!


Now we have a new problem to solve! They want to hang it in our reading corner! But it is a whiteboard wall! They came up with the idea to use duct tape! Some had the designed duct tape with pictures on it and others had the traditional gray kind. I asked if one kind was stronger than the other. They have decided to bring in their duct tape and we will experiment to see which is the strongest! Whichever duct tape is the strongest will be the one we use to hang up our beautiful art! I can't wait to see what they find out!  I will make sure to post a picture of the finished wall in the reading corner after the art and documentation of the project is up!


Saturday, October 4, 2014

The Autumn Season: Exploring Trees and Leaves and the Colors of Fall!

The kids have started noticing signs of fall!  They had started bringing me leaves, so I knew it was time to start investigating Fall! I started out by asking what they wondered about Fall.  They came up with some very good questions!


We posted the questions on our inquiry wall. This wall will grow as they wonder new things and answer the questions!


I set out some provacations about Fall to see what they would notice.  On our look closer table, I set out fall leaves and colored water to see what they would do.  I layed leaves that were from the same color scheme next to the color mixing tools and provided resources about leaves for them to look at. 


They started out mixing the colors and observing what happened.  


Then they started trying to create the colors of the leaves! This took a lot of thought and trials to figure out how much of each primary color was needed to match the shades of the leaves!


"I'm trying to make the color of this leaf."


We took them outside to observe our Ash trees in the playground. They noticed that the tree's bark was rough, had moss on it, and the leaves were red, orange, yellow, green, and purple! After looking closely, they began to document through observational drawings.


After looking closer, they began documenting fall trees in other ways! Through paint,


and clay!


The friend who created the sculpture above was using the tree across the parking lot as a model. He even noticed the little branch sticking out on the bottom! Now that is noticing and documenting with detail!

I set out a provacation of pressed leaves they had brought in, watercolors and sharpie markers! I was curious where they would take this! They blew me away with the observational drawings they created! They truly looked close, used the sharpies to show the lines and detail, and used the water colors to record the colors in such beautiful detail! More beautiful documentation through art!


We have a few more questions to answer before we are finished, but the autumn season has provided some great opportunities for the kids to notice things about the world around them, ask questions and show their learning!

Here are some other things that have been going on in our room!

Experimenting with color mixing and painting corks with the colors they create.  We will use these to create a collaborative art piece for our room showing the spectrum of colors. 


Exploring patterns with different materials and noticing patterns in our environment!


Materials have been provided to explore numbers, counting, shapes, and measurement.


Our friend below is figuring out how 12 inches is equal to 30 centimeters. 


Making plans, as you can see from the photo below is serious business!


Authentic use of writing as they create "Do not touch" signs for works in progress. 


Letter review and learning our first three reading stratagies for when you get to a hard word: 1) Look at the picture. 2) Use your pointer finger. 3) Look at the first letter and get your mouth ready. 


Using materials in our room to practice literacy skills. 


So much goes on in our class every single day!  The kids have come up with an idea for a project! It will take a lot of problem solving, but I think this wonderful group will be able to pull it off! I can't wait to let you know how it goes! Stay tuned!